Sunday, 15 July 2012


Made using my mask tutorial. See previous post.

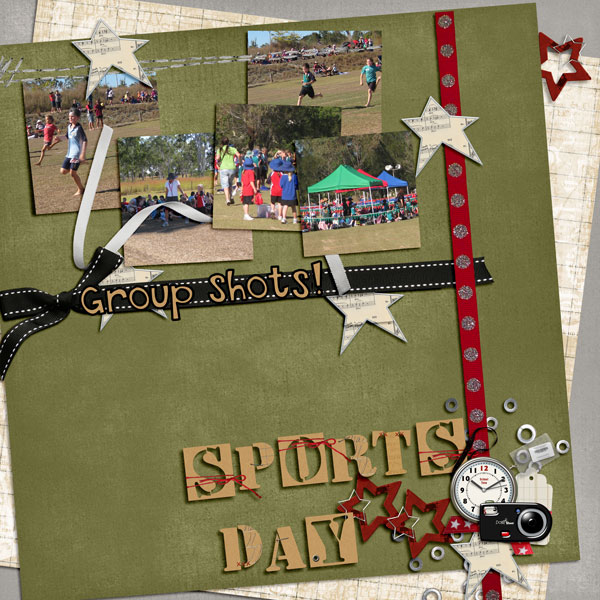
Photos of Gladstone Harbour -coal loading facilities- day and night.
Creating a photo mask: by Sandie03

A mask works by selecting some parts and eliminating other parts of any photo it is combined with. Black mask selects from the photo/text; white eliminates or subtracts from the photo.

Making a mask can be done many ways. This is my simple version using text, brushes and shapes.

1. Open any basic shape. I used a rounded edge rectangle.


2. Choose a fancy block font. On a new layer type some text eg Summer. Move the new layer to position it so it just overlaps the top (or bottom ) of the shape. Resize to fit the shape.


3. Select a flower/ foliage/ star brush. On a new layer stamp/brush several flowers around the plain edges of the shape. Repeat with other flower, foliage, or stars brushes. (I put each brush on a new layer so I can delete easily if I need to.)


4. Now select all the layers and merge into one layer.(CTRL-E)


5. Create a new layer below the merge layer and fill with black.


6. Return to merge layer and select the outer edge of the shape (moving ants) (Magic wand tool)
7. Go to the black layer. Use CTRL-J to create a copy of the shape selection from the
black layer.


8. This black shape is your new mask. Crop to the mask. Save just this layer as a new .png document.
9. Apply this mask to a photo ( use CTRL-Alt_G in Photoshop). Merge layers if desired.

Saturday, 16 June 2012

Current favourite pages digiscrapped

June has been a busy month for my digiscrapping- with Creative Team (PDW) duties and challenges, and writing a couple of tutorials for digiscrappers. (See previous post for one on creating and uploading a signature line.)
Here are a couple of my favourite pages from this month.


Blue eyes a challenge at Digital Scrapbooking Studio using a minikit and text paths by Feli: Blue Like that mini- my beautiful daughter aged 4, many years ago.


And the same person- see that same brilliant smile - a few years later.
This challenge at DigiDesignResort was again by Feli asking for the use of a text path (text in a shape). I used part of the DDR Designs May collab: Magic Breath, by J and M Creations.

Tuesday, 12 June 2012

Creating and Uploading a scrapped signature line

Basics are the same whichever program you use: Photoshop, Elements, PSP, etc

They are: 1. Choose kit, 2. Scrap, 3. Resize and save, 4. Upload


1. CHOOSE KIT:
1. Choose the kit and alpha you want to use.
Check TOU to ensure designer allows you to make siggies (online items) with kit (Some will have restrictions)

2. SCRAP THE SIGGIE:
Open up 12x12 page, and scrap your name with alpha.
Align the letters if wanted, or go for a more random arrangement
Add / layer elements around the alpha as a cluster. Always choose at least one horizontal ribbon/ paperstrip/ string to draw eye across the siggie. Detailed or minimal is up to you. Add photo if wanted.
Add fine shadows as needed.
Add text layers: credit the kit designer here. Add any CTs, blogs, FB addresses.(Check the digital scrap site before uploading as each site differs in what external site info they allow on a siggie).

3. RESIZE AND SAVE
Crop your page to slightly larger than the signature.

Go to Image/ Image size and change this to maximum 500 x 200 (at PlainDigitalWrapper) (this varies on different sites). Save.


Save as a layered file. ( in case you need to make changes at different sites.)
Save as a jpg file for gallery showing.
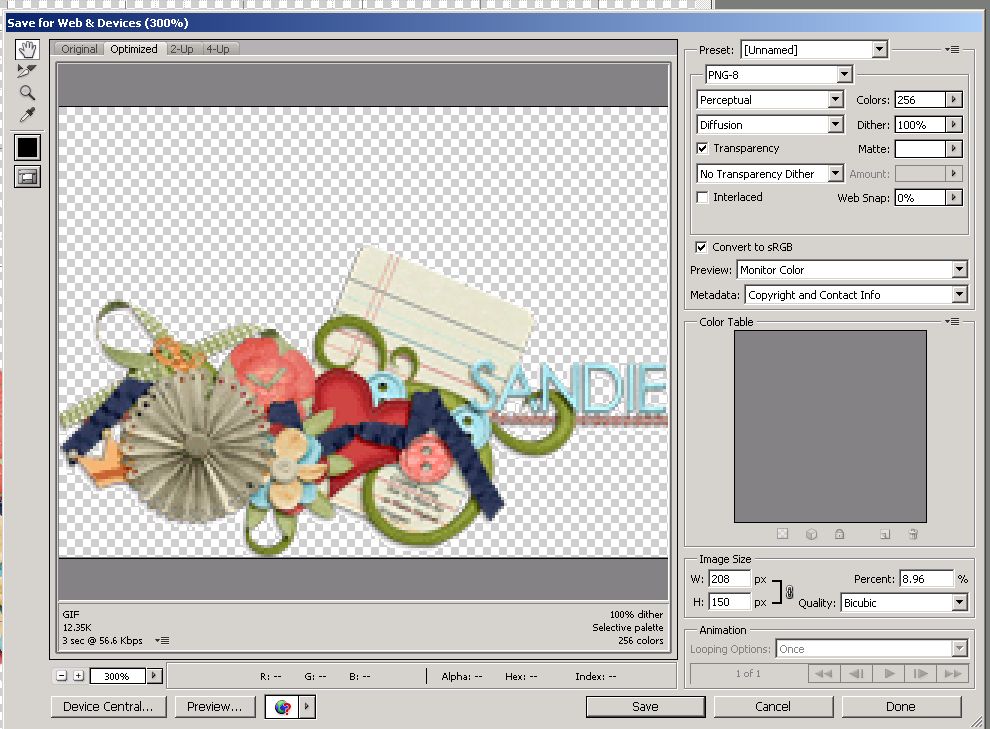
Save to web as a .png file ( no white background to show) for siggie. Save to web- choose type- PNG-8 , Tick Transparency, Tick constrain proportions, Save.


UPLOAD TO PDW as a signature: 2 options

Option 1: send the file to PhotoBucket or other photo host site first,

Copy the URL/ direct link at the host site

Option 2: keep the file on your computer and upload from there
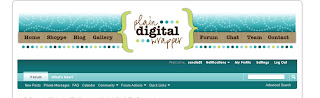


Open PDW Forum. On top darkest teal bar, choose SETTINGS.

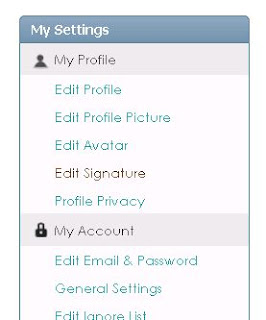
Go to MY SETTINGS (left side) and select EDIT SIGNATURE.


Scroll to bottom of page and find Upload Signature Picture.
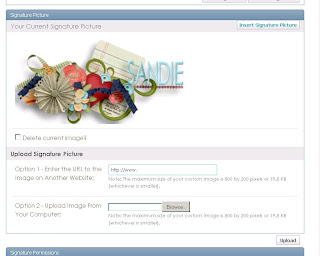


Either paste in URL/direct link from photo host site OR upload the png file directly from your computer.

Click UPLOAD button (bottom right)

Your Signature Picture should show in box.
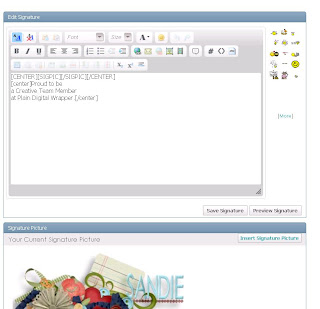


Go to box at the top where it says [sigpic][\sigpic]
Add any extra text you want on new lines beneath this. (eg: Love being at PDW)
All should work now.


Saturday, 26 May 2012

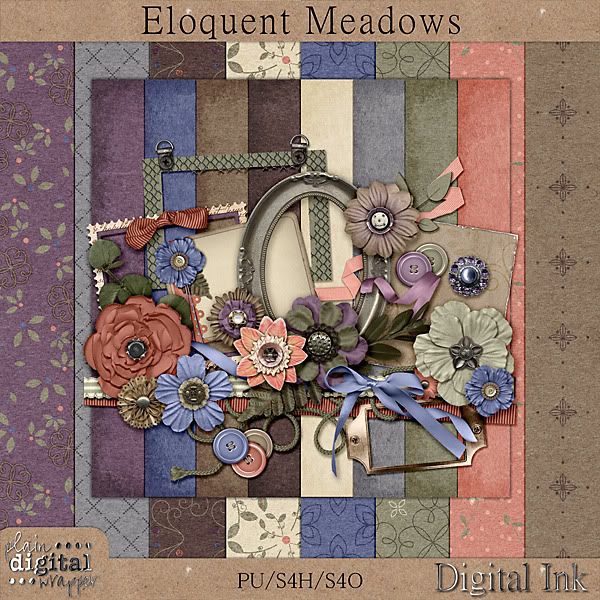
Eloquent Meadows by Digital Ink


Another beautiful kit by Melissa Knopik who creates as the designer Digital Ink. This is called Eloquent Meadows and is very versatile. I'll be using this for my heritage layouts as it has soft, subtle textured plain papers and lovely elements, but the patterned papers are equally as beautiful and co-ordinate wonderfully with the plains.

Never too old to learn...

When visiting DST - Digital Scrap Talk - these days, the home page is like a blog with great articles which change daily. One I found a couple of days ago prompted this layout. It was a Portrait in Font/Text tutorial by Jennifer White (both written and in video format.
Basically, you make 3 brushes from words- one dark/heavy/bold, one light/faint/dainty and the third in between. These brushes are applied to an extracted, posterized, black and white portrait, each brush on a separate layer, which are then flattened into one layer. Add to a layout and adjust the opacity and it is done.


Here's mine using a lovely photo of Tracey in her teens, and the Welcome Kit from Plain Digital Wrapper. Newcomers to the PDW site can earn this huge colourful kit for free by posting a challenge layout, posting in the forum and commenting in the gallery. What a great joining bonus.

Go here for the information Welcome Kit


Wednesday, 23 May 2012

4x Gallery Stand Out at PDW

I must be on a roll with my digiscrapping as I have earned 4 accolades- Gallery Stand Outs in the last 2 weeks at Plain Digital Wrapper.


Monday, 21 May 2012

ArtgalStyle - Field Trip Ahead

Having spent a few days revisiting my family History research, checking past searches and looking for new avenues (only one slender branch expanded), I was ready to digiscrap again. Here's today's offering- Field Trip Ahead- lovely kit by ArtGal Style at Plain Digital Wrapper.


ArtGal Style Field Trip Ahead here

Field Trip Ahead

Saturday, 19 May 2012

Layouts for memories

Now that I am on leave from work,, and planning my retirement, I am free to travel as I wish. Recently I made a trip to South Australia, capital city Adelaide and the wine growing region Barossa Valley. I visited in Autumn and was amazed at the beautiful colours in the trees and in the leaf litter. This photo was one taken in Hahndorf at the homestead, The Cedars, home to Hans Heysen an Australian landscape, still life and lifestyle artist from the early 20th century. I love his Australian landscapes- wide open places, towering gums, mysterious shady spots, far blue hills, but more so his lovely character studies of life in those distant days.
And listening to our informative guide when in his studio, I could almost see him prepping and creating for his large scale art works. I was impressed with how meticulous he was to his art and getting things to appear balanced, with sketches, grids, blocking, use of light- not so much different from my hobby digital scrapping, or Tracey's serious photography.


Wednesday, 16 May 2012

Scrapbook layouts for ScrapDZines

As a Creative Team member for Plain Digital Wrapper, I have the opportunity to scrap for a selection of great and diverse designers. This month I created layouts for ScrapDZines using her lovely Beach House kit.


My first page features my grandpup Missy on a visit to the beach, created for a PDW white space challenge using a monochrome theme, sepia image and one splash of colour.


The second page features an overexposed photo of a hidden lagoon. This page was for a DDR challenge using a photo I would hang on the wall as a painting.

Tuesday, 15 May 2012

A face lift for my revitalised blog.

Have spent the past few days digi-scrapping for Plain Digital Wrapper as a member of the Creative Team and found a wonderful digiscrap kit - Afternoon Delights by Digital Ink - to use to revamp my blog. (The designer, Melissa Knopik, allows blog use for non-commercial sites.)
Find the kit Afternoon Delight here:

And here are two pages I created using Afternoon Delight


Saturday, 12 May 2012

New blog start for new lifestyle

Saturday 12 May 12
I'm currently on long service leave from work, practising for retirement and I'm loving every day so far- time to eat a leisurely breakfast, read the papers and do some mind puzzles before morning tea.
Afternoon sleep if I feel the need. Lie down to read my kindle, with lots of great books - thankyou Rob and Tracey.
No rush or bustle, no late afternoons at work. Time to walk while Rob feeds the horses. Time to relax. And time to spend touring, taking photos, digiscrapping, genealogy searching (revisit every step of my family history research and update this information and perhaps break down a couple or more brickwalls) and blogging.
So I plan to revamp this blog sometime soon.

First - one of my latest digipages- Billy RIP.(credits: All Baseball by ScrapDZines at Plain Digital Wrapper)

This page has prompted me to look at ways to sharpen those out of focus pictures from pre-digital camera days.

Saturday, 7 February 2009

Back to work month


It's four weeks since my last blog and the new me is underway - already 4.2 kg lighter (that's over 9 lb) and getting fitter by the day. That's almost 1/3 of the way to my goal (15 kg). I am so impressed with WW new revamped Points plan and Satisfaction eating plan- plus the fact that a new WW meeting opened up in my hometown - no longer do I have the excuse that 30 km each way is too far to attend a meeting.


I have been back at work for two and a bit weeks- settling into our new building and decorating the walls to take the blandness away. I used removable wallpaper stickers for the walls and windows. I think they look pretty good - especially the fun sea creatures (on cream and soft green walls). Noah's Ark is also outstanding against the soft green wall) though my photo was not brilliant. The dolphins are on a soft yellow wall, and the flowers are on windows covered by narrow venetion blinds. Sadly the wall colours do not photograph well - they all look like shades of mud!!!


My new work-supplied laptop - used for 2 weeks before Christmas and 1 day after - and it is persistently showing that dreaded blue screen. Back to the workshop for adjustment. Not a good start.


Saturday, 17 January 2009

The new me

Decided it's time to measure up and get slinky.

Here's my motivation- I asked Santa for this mirror for Christmas, and he replied that I have to make it myself. So I'm starting.

Here's my before picture:


Hope the after one is a better shape!!!


-

Week 2 Project 365


My layouts for week 2 - I have found a simple template I love for this project, so here is last week's redone, plus the new one for this week.


Many thanks to Hummie at HummiesWorld for this template.
I have had an interesting time with photos this week, including learning some skills for taking self-portraits through a mirror and using my tripod and self timer. I still cannot get the smile right on cue for the self-timer flash- either too forced from holding it for 10 seconds, or just missing altogether.
One of my hobbies is family history researching. Great news this week was the on-line release of the 1911 UK census images - 2 years earlier than expected.
I hoped it would help solve the biggest mystery of my research- the whereabouts of Sidney Edward Hill,(or Sydney) born in London between 1856 and 1859, parentage and place unknown, married in London (certificate found) and migration to Australia, Boer War service, occupation, voting in Australia (all recorded). The last known was that he might have returned to UK in 1907-1908, but no death has been found for him. And no, he wasn't on the 1911 census either. So the mystery continues.
Still, I found images of several other family lines, but nothing unexpected yet.

Saturday, 10 January 2009

Happy New Year

Wishing everyone a wonderful new year - filled with peace, tolerance and justice for all.
A wonderful family Christmas was enjoyed by us, with family and friends and restrained celebrating by all.
Since then, I have spent time revisiting my Family History notes ( by way of reading before throwing out many handwritten paper pieces dating from 1996), taking photographs and scrapbooking both real life and digital forms.
I have chosen to take part in the Project 365- a photo a day recorded and scrapped (perhaps). I started this - a photo and a layout a day- first in 2007 and I created 2 months worth of layouts before work committments and life intervened. It is a big commitment, but highlights that something interesting happens every day- even mundane things can become interesting when photographed from a different angle, or journalled about in a clever way.
My first week's layouts: template by Claudette Wooddell-photo-a-day

Wednesday, 24 December 2008

Christmas Eve in Australia


We have as a family just celebrated Christmas Eve together. Four generations- Aunt Dorrie, my husband and I, our children Tracey and Glenn, and their fur babies Zoom, Jonty and Missy.


We decided on a typical Australian feast. Starters were nibbles of olives, gherkins, cocktail onions, kabana, cheese. Mains was seafood (prawns and coral trout) and salads, followed by pavlova (meringue, cream, kiwifruit and banana) with ice cream for dessert. The table was decorated and a Christmas tree was illuminated. We ate on the outside deck under the Christmas lights and listened to Christmas Carols from an old vinyl record (sung by Gene Autry). What a relaxing evening it was, before the hectic call of Christmas day.
We wish you all a very Merry Christmas and a Peaceful New Year.

Wednesday, 17 December 2008

The Week before Christmas


The week before Christmas- and what am I doing?

Cleaning the house - washing internal walls, windows, refreshing curtains(good strong breeze and lots of sunshine today), rearranging furniture, changing quilt covers and preparing rooms for visitors. Plus the hugest clean out of cupboards for the recycling dumprun today- probably a car load full- periodicals and magazines from the last 5 years- family history, scrapbooking, Turf monthly etc.

And I'm finally moving some things into the new shed- jigsaws (of which I have 120 for my retirement) and suitcases and photo-frames. How all this stuff ever fitted in my cupboards is a puzzle in itself- the cupboards still look full, but so is the shed. Where did it all come from?

Friday, 12 December 2008

Christmas Around the World Blog Train

Christmas Around the World Blog Train- my contribution.
My 2 photo quickpage (png format) and my minikit (papers, frames, wordart and tree design)


Christmas around the world Blog train for Digiscrappers starts today.


I am joining in with Hummie's group with a minikit called SandieH-2008 Catw in blues, green and silver.


Here is the preview and the links for the minikit and an amended file,


http://www.4shared.com/file/74841591/ae11a583/SandieH_2008_CATW.html

http://www.4shared.com/file/75462142/3c7f15e9/SandieH_2008CATW_extrafile.html

and my Quickpage


http://www.4shared.com/file/74839947/8c527360/SandieH-2008_Catw-QP.html


Hope you join the train and find lots of goodies to share.